Getting Started
Misty's .NET SDK provides a powerful set of tools for building and debugging skills using Visual Studio. This guide provides instructions on setting up Visual Studio and installing the C# skill template, so you can quickly start building your own .NET skills for Misty.
Setting Up Visual Studio
Follow the steps below to install Visual Studio and the components required to build .NET skills for Misty.
Note: The focus of this guide is setting up Visual Studio for .NET skill development on a PC or virtual machine running Windows 10. If you need more information about configuring Visual Studio to work with your environment, consult Microsoft's guide to installing Visual Studio.
- Download Microsoft Visual Studio. Misty's .NET SDK is compatible with Visual Studio Community, which is freely available.
- Install and run the Visual Studio Installer.
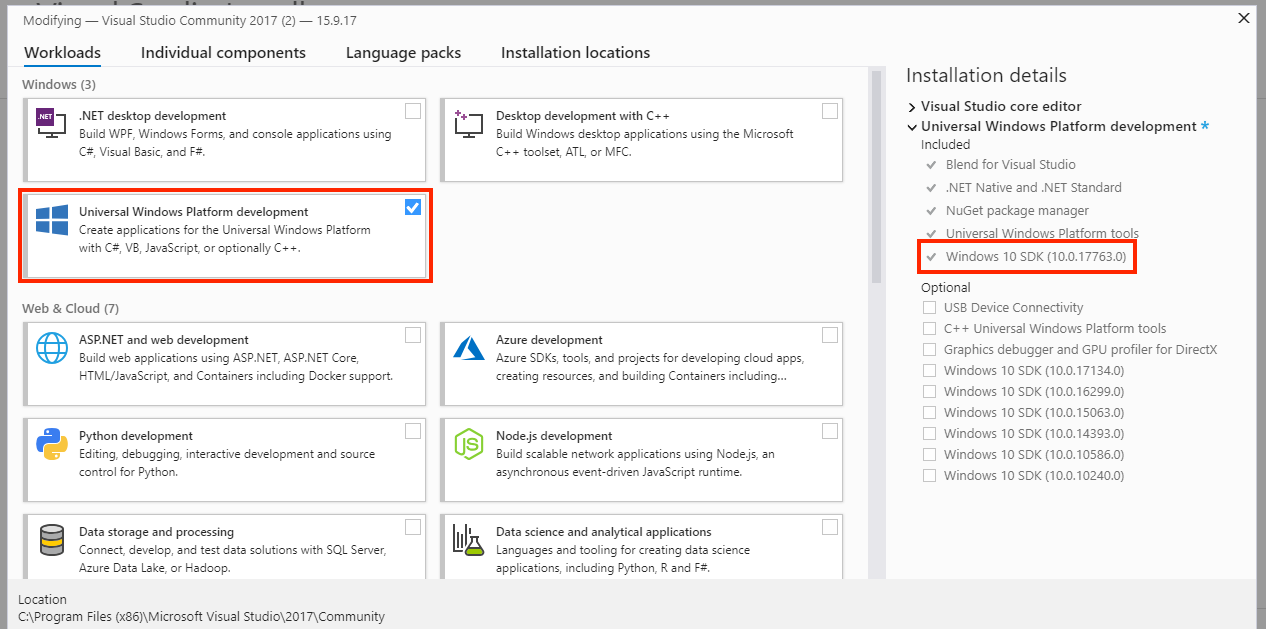
- When choosing the workloads and components to install with your Visual Studio installation, check the box to install the Universal Windows Platform development workload. Under Installation details, make sure there is a checkmark next to the required Windows 10 SDK library (build 10.0.17763).
- Choose any additional workloads and components you'd like to use with Visual Studio and click Install.
Note: If you already have Visual Studio installed, you may need to modify your installation to include the UWP development workload and the Windows 10 SDK library required to build .NET skills for Misty (see step 3 above). To install these components, launch the Visual Studio Installer and click Modify. See Microsoft's documentation for more details about modifying Visual Studio.
With Visual Studio set up, you're ready to start building .NET skills for Misty. Follow the instructions below to install the C# skill template, or download the IntroSkills sandbox to explore a sandbox of pre-built .NET skills!
Using the C# Skill Template
Skills you build with the .NET SDK assemble into IoT background applications that run alongside Misty's software on Windows IoT Core. When Misty initiates a .NET skill, her software launches the corresponding background application, which instantiates the interface used to invoke commands and get data from the robot in your skill code.
The quickest way to build a .NET skill from scratch is to use the C# skill template for Visual Studio. When you use this template to create a project, Visual Studio installs Misty's .NET SDK libraries and creates a new C# project with the background task and skill code files you need to build a .NET skill.
Installing the Template
Follow these steps to install the .NET skill template from Visual Studio:
- Launch Visual Studio.
- Select Tools → Extensions and Updates from the top menu.
- Select Online from the left menu, and type misty robotics into the search bar.
- Locate MistyRobotics.MistySkillExtension in the results. Click Download.
When the download completes, you must restart Visual Studio for your changes to take effect. Close Visual Studio and follow the prompts in the VSIX installer to finish installing the template.
Creating a .NET Skill Project
With the template installed, you can follow these steps to create a new project for your C# skill:
- Launch Visual Studio
- Select Create a new project… from the New project section.
- Navigate to Installed → Visual C# in the left menu. Select Misty C# Skill from the results.
- Enter a name for you project and solution.
- Click OK to create the project.
Visual Studio uses the template to create a solution and project for your C# skill. The project is structured as follows:
|-- <YourSkillName>
|    |-- Properties
|    |    |-- AssemblyInfo.cs
|    |    |-- Default.rd.xml
|    |-- References  // MistyRobotics SDK & other libraries
|    |-- MistySkill.cs // Your skill code
|    |-- <YourSkillName>_TemporaryKey.pfx
|    |-- Package.appxmanifest
|    |-- StartupTask.cs // Background task wrapper for your skill
- The
StartupTask.csfile is the background task wrapper for your skill code. This file is automatically populated with the methods required for running a .NET skill. You can deploy your skill to Misty without modifying this file. For more information about developing background applications, see Microsoft's developer documentation on the subject. - The
MistyNativeSkill.csfile contains your skill code. It is configured such that you can immediately begin writing your skill code in the body of theOnStart()method. For more information about writing your skill code, see .NET Skill Architecture.
You can customize and organize the contents of this project as needed to serve the functionality of your skill.
Building & Deploying a .NET Skill
Once you've customized the project with your own skill code, you can follow these steps to deploy your C# skill to Misty.
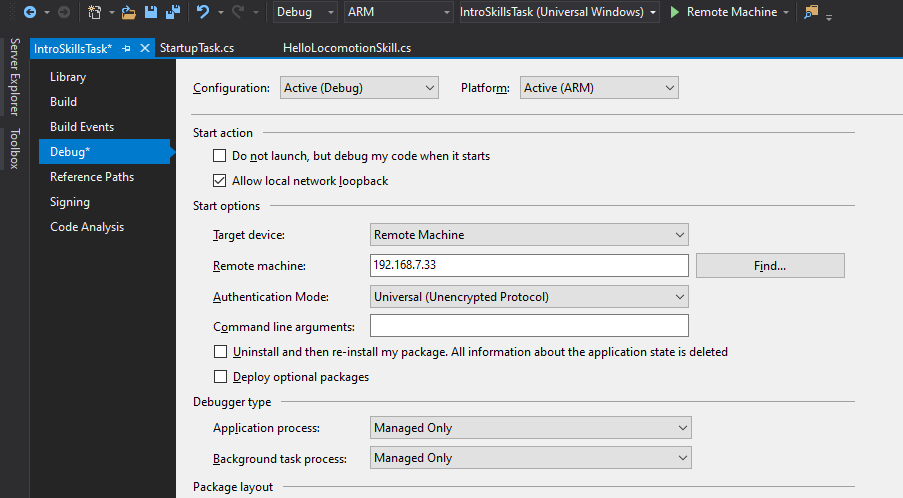
- Use the drop-down menus at the top of your Visual Studio window to set your solution configuration to Debug and the solution platform to ARM.
- Select Project → Set As Startup Project from the top menu in Visual Studio.
- Right-click the name of your project in the Solution Explorer and select Properties. Follow these steps to configure the project for deployment to Misty:
- Select Debug from the left navigation menu.
- From the Target device menu, select Remote Machine.
- In the Remote machine field, enter Misty's IP address. Important! If you have not manually applied Misty's 2020.01.07 Android patch, then you must use the IP address for Misty's USB-to-Ethernet adapter in order to attach a remote debugger. If you have applied the patch, you can attach a debugger using Misty's Wi-Fi IP address (supplied in Misty Connect).
- From the Authentication mode menu, select Universal (Unencrypted Protocol). Your configuration manager should look like this, with your robot's IP address in the Remote Machine field.
- Make sure your robot is powered on and connected to the same network as your computer. Then, click Run/Deploy in Visual Studio. (Deployment can take a few minutes. Check the Visual Studio console to know when deployment is done.)
- After deployment, you may need to reload Misty's skills before you can access your .NET skill from the Skill Runner web page. To reload skills, issue a POST request to the API Endpoint for the
ReloadSkillsoperation:POST <robot-ip>/api/skills/reload. - Open up the Skill Runner web page in your browser and connect to your robot. Your .NET skill should appear in the Manage section of the page. Click Start to start run the skill.
Creating a .NET Skill App Package
In addition to deploying skills directly to Misty, you can use Visual Studio to create app packages for your .NET skills. This makes it possible to share runnable .NET skills without publishing the code for your skill project. You can install app packages for .NET skills using the Skill Runner web page.
Follow these steps to create an app package for your .NET skill:
- Open your skill project in Visual Studio.
- In the Solution Explorer, right-click your project and select Store → Create App Packages.
- Select I want to create packages for sideloading, and deselect the option to Enable automatic updates. Then click Next.

- On the next screen, use the Output location field to select a local directory for your app package. Check the box next to ARM, and choose a solution configuration (Debug or Release). Then click Create.

- Visual Studio notifies you when your app package is ready. The folder with your app package is stored at the location you choose in step 4. The name of the directory should resemble
<YourSkillName>_1.0.0.0_Debug_Test.
Once you've created an app package for your .NET skill, you can compress the entire directory into a single .zip file and install the skill on Misty II using the Skill Runner web page.
Important Notes & Workarounds
Misty's .NET SDK is currently in Beta. Related software, libraries, and documentation are still under development and may not be reliable at this time. This section lists a few known issues with the .NET SDK. Refer to these items to troubleshoot issues you have while developing .NET skills. If you experience something that's not listed below, help us improve the SDK by filing a bug in the Misty Community forums.
- If you have not manually applied Misty's 2020.01.07 Android patch, then you must use the IP address for Misty's USB-to-Ethernet adapter in order to attach a remote debugger. Misty must be connected to a USB-to-Ethernet adapter, and you must deploy the skill you wish to debug using the IP address of the connected adapter. You can still deploy and run skills using the Wi-Fi IP address provided in Misty Connect, but you cannot use line-by-line debugging to step through the skills you deploy this way. If you have applied the patch, you can attach a debugger using Misty's Wi-Fi IP address (supplied in Misty Connect). For more information about deploying skills via a hardwired connection, see Connecting to Misty's 410 IP Address.
- The first time you deploy a skill, it may fail to attach for debugging after deployment, and you may see a message in Visual Studio that indicates the skill is already running. If this happens and you want to walk through the debugger with your skill, you can generally just deploy the skill again, and it should attach for debugging the second time. If you don't care about walking through the debugger, you don't need to re-deploy before you run the skill. You can ignore this message from Visual Studio and start your skill from the Skill Runner web page..
Connecting to Misty's 410 IP Address
If you have not manually applied Misty's 2020.01.07 Android patch, then you must deploy .NET skills using the IP address for connecting to Misty's 410 processor in order to debug your skills with Visual Studio. This means Misty must be connected to your router with a USB-to-Ethernet adapter. Please note that this adapter does not arrive with Misty, and must be obtained from a retailer other than Misty Robotics.
Follow these steps to get the IP address for your USB-to-Ethernet adapter:
- Connect the USB end of a USB-to-Ethernet adapter to your computer. Connect the other end to your network router. Do not connect the adapter to Misty yet.
- Use the command line to find the IP address of the adapter.
- On Windows, open the command prompt, enter
ipconfig, and find the Ethernet adapter and its IP address in the list of results. - On Apple/Unix, open a command-line tool, enter
ifconfigand find the Ethernet adapter and its IP address in the list of results. Note: On a Mac you may also be able to find the IP address under System Preferences → Network.
- On Windows, open the command prompt, enter
Tip: If you have trouble finding the adapter's IP address, try disconnecting the adapter from your computer. Then:
- Run an
ipconfig(or, for Mac users,ifconfig) command in the command prompt / terminal window. - Plug the adapter back in
- Run the command again. Look for the difference between the results to find your adapter's IP.
When you locate the IP address for the adapter, save it for use when connecting to Misty. Unplug the USB end of the adapter from your computer and re-plug it into the USB port on the back of your robot. Keep the Ethernet end of the adapter connected to your router.