

Misty II Overview
Your Misty II robot has been designed and built by the Misty Robotics team. This document provides some quick, out-of-box setup steps and helpful details about using Misty II.
To avoid the risk of driving Misty off a high surface, we recommend either working with your robot on the floor, or temporarily elevating the treads so the robot cannot drive. To do this, you can place Misty on the the foam block stand that arrived in the box. While Misty is designed to automatically detect obstacles and ledges, placing her on this foam block will ensure that she doesn’t accidentally roll off the table while you're coding.
Unpacking your Misty II
Misty II arrives packed safely inside her carrying case. The easiest and safest way to remove Misty from her case is to open the latches and position the case vertically, so the robot is fully upright. With the case open, grip the Misty II by its torso (never by the arms) and gently slide it out of or into the case.
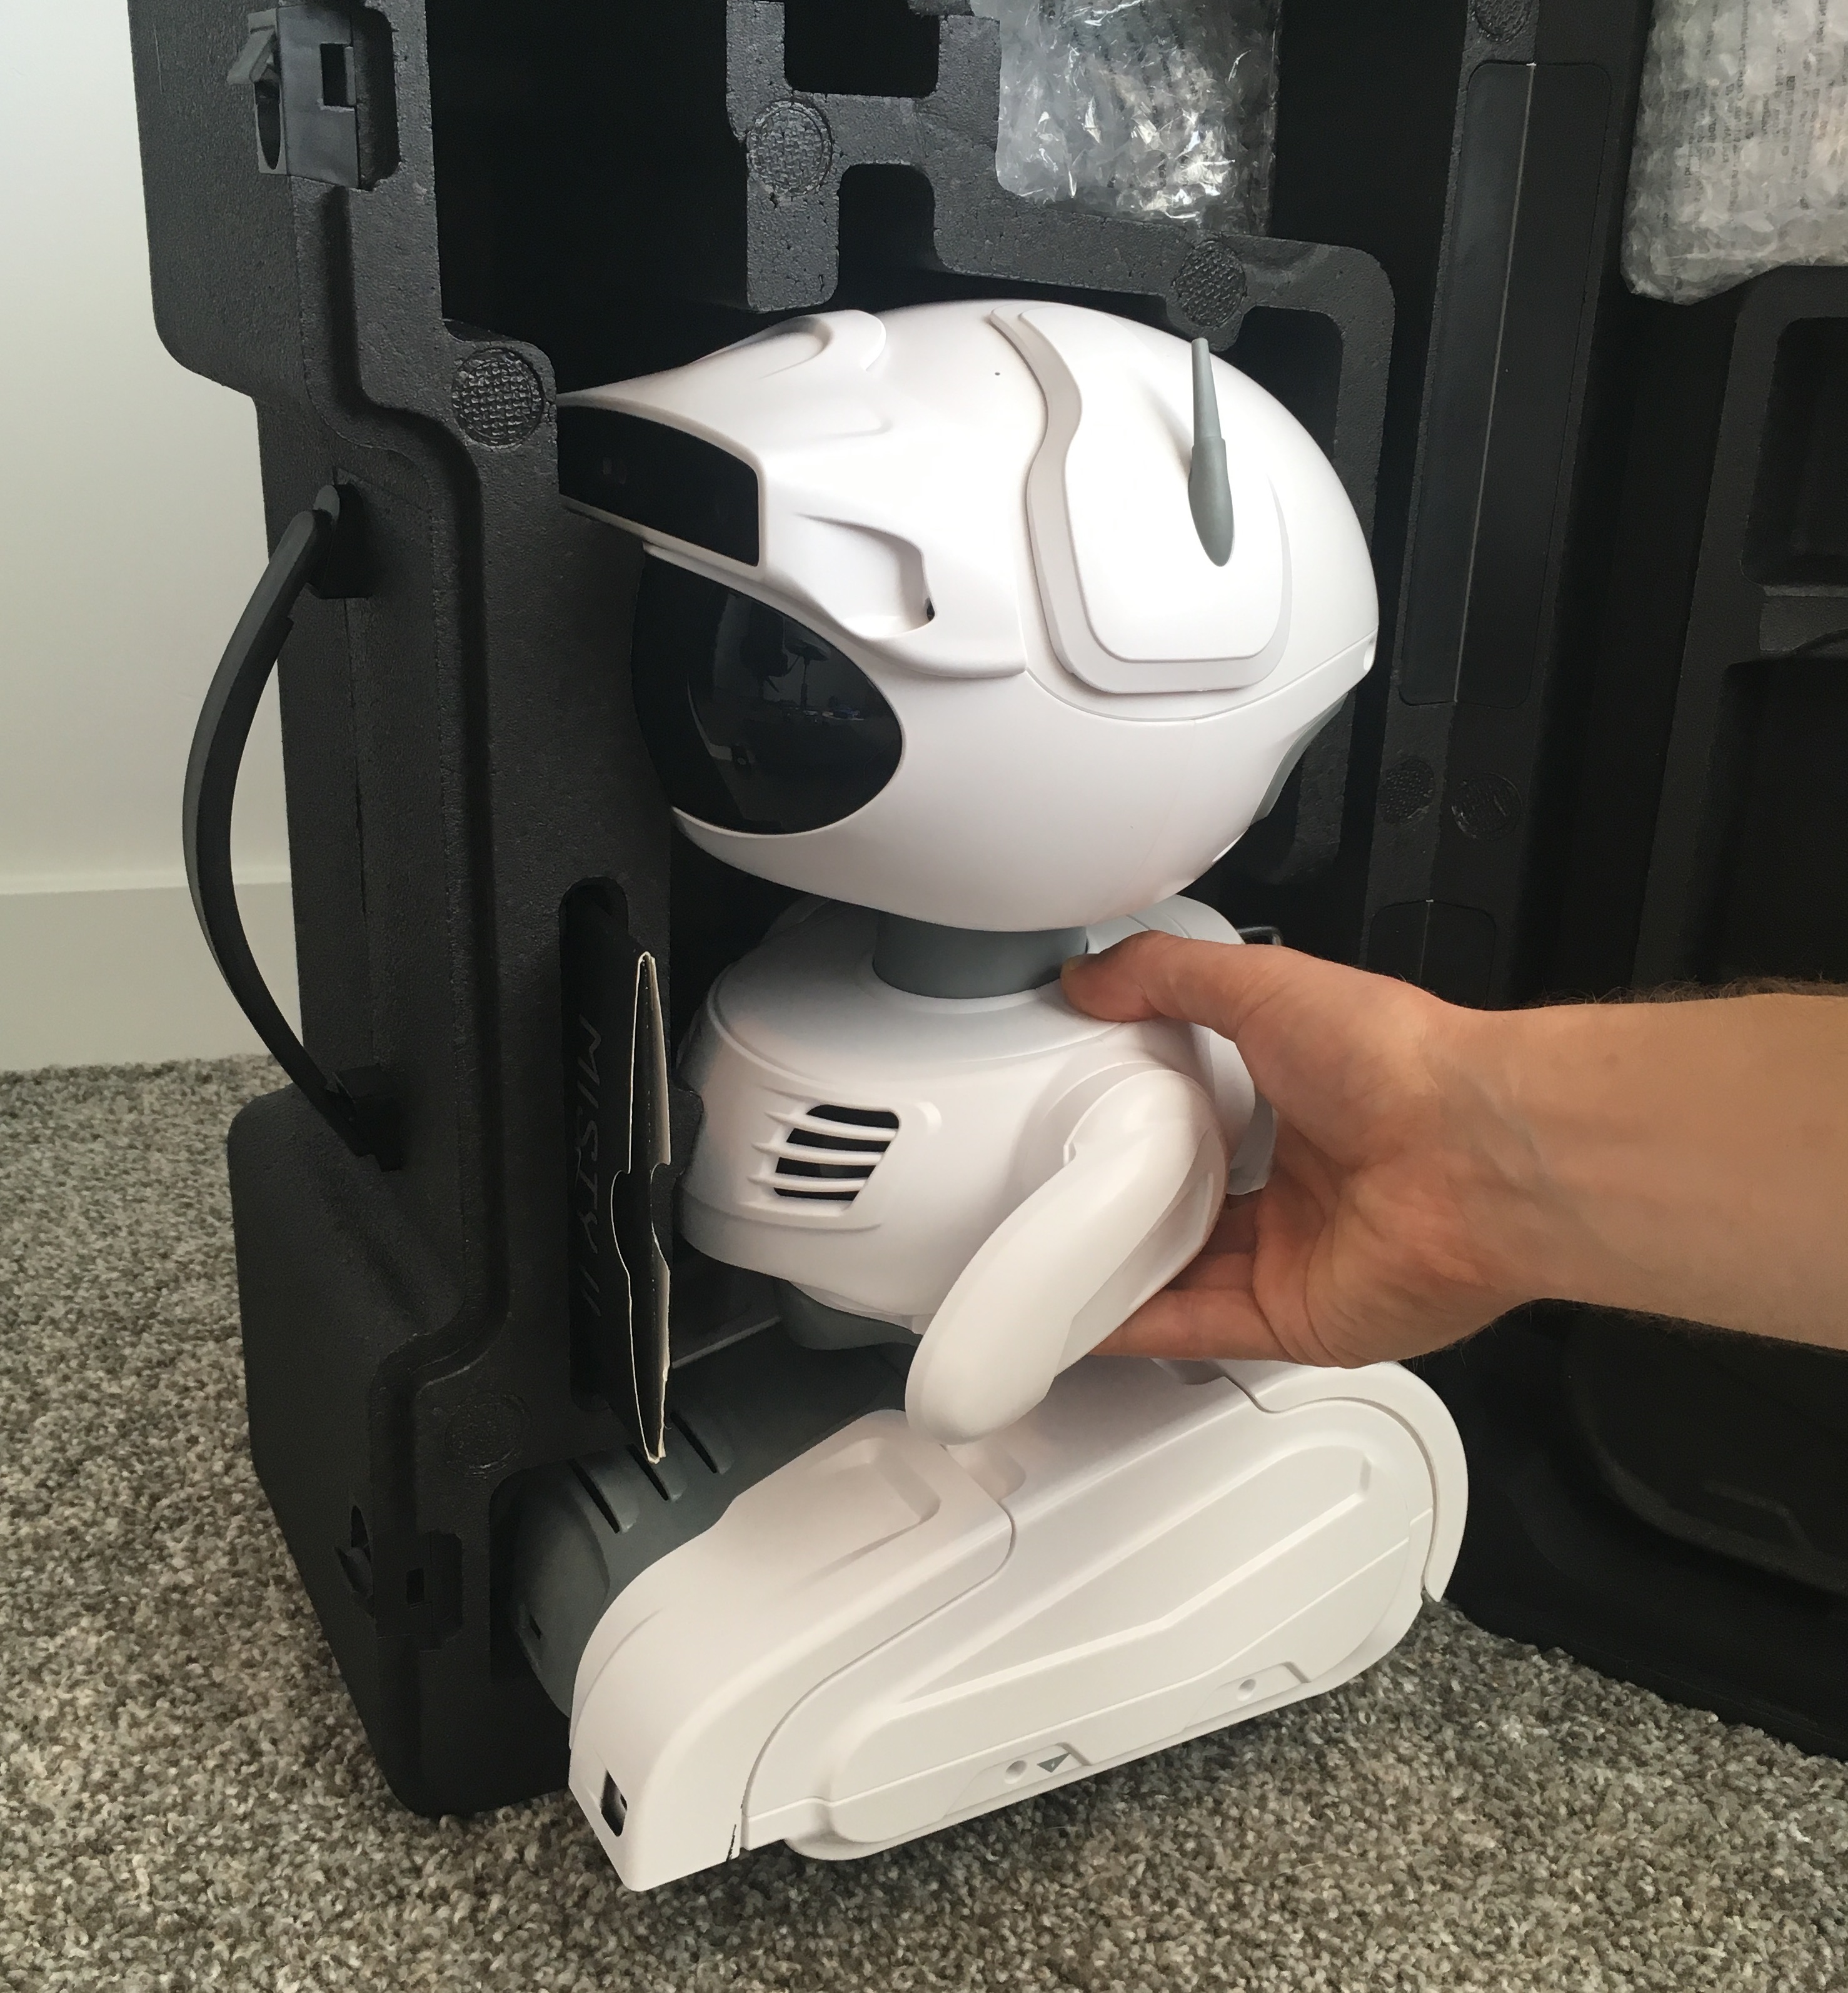
Note: The robot’s arms and related components can become damaged under excessive force. To avoid damaging your robot, never remove the Misty II from its packaging by pulling on its arms.
Misty II arrives with her magnetic headpiece and backpack attachments connected. In addition to the robot, the carrying case includes the following items:
- charging station
- charging station AC power supply
- foam block stand for Misty II
- legal guide
- printed User Guide
Note: Misty's packaging has been specially designed to protect your robot during shipping. Please keep all original packaging for shipping or for traveling with your robot in the future.
Powering Up & Powering Down
We recommend powering up Misty on the floor, if possible, to avoid the risk of driving your robot off the edge of a table or other high surface. If you are experimenting with Misty on a table top, place her on the foam block stand that arrived in her carrying case to elevate her treads above the surface of the table.
Turning Misty On
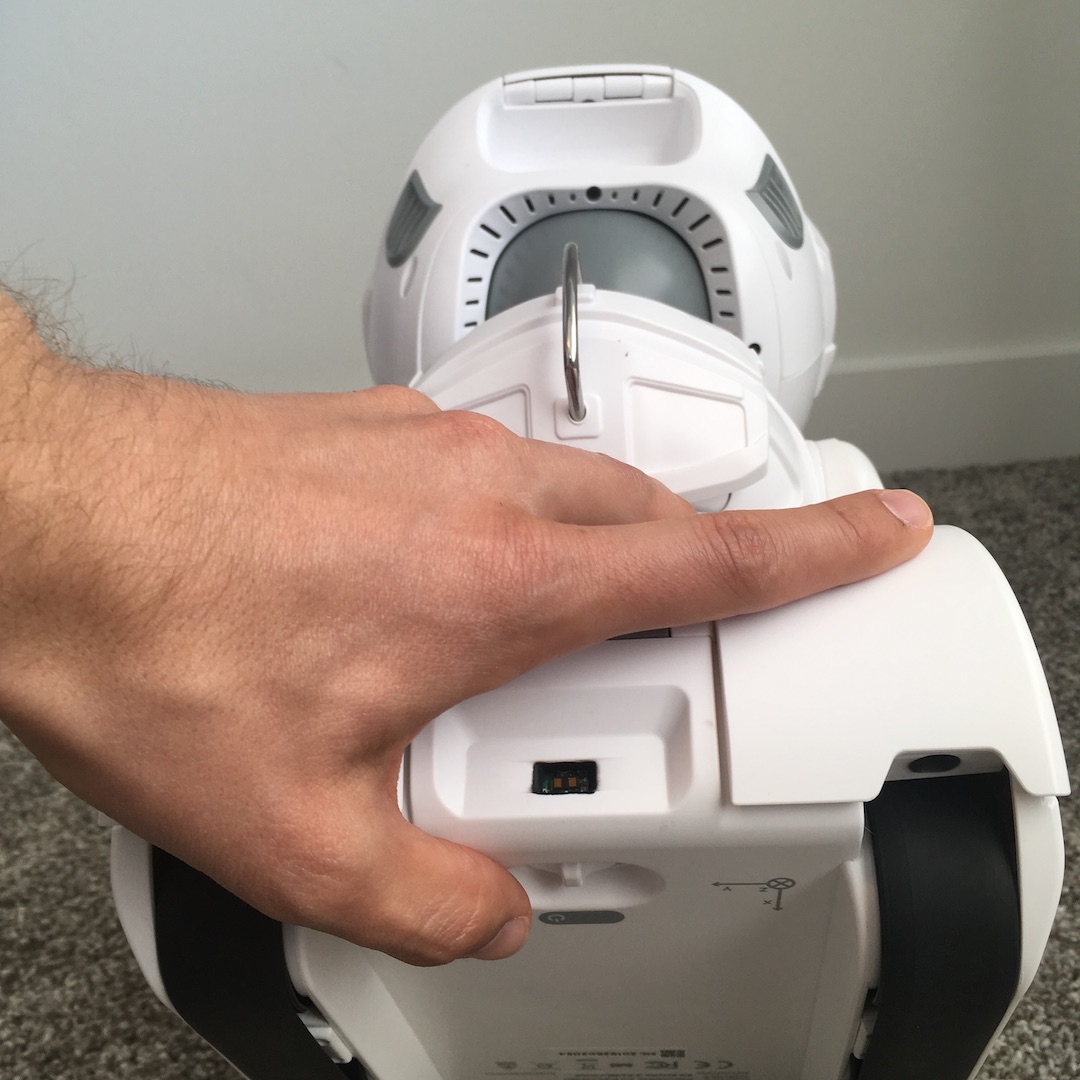
- Toggle the power switch on Misty's base (located between the treads beneath the rear time-of-flight sensor).
- The Misty Robotics logo first appears on the screen. Then Misty’s eyes appear, beginning in a closed state. The eyes gradually open as Misty boots up.

- When the eyes appear fully open, Misty is done booting up. This should take a little more than a minute.

Note: Your Misty II arrives with her battery charged and should not require additional charging before first use. When her battery is low, Misty may fail to respond to some API commands. If this happens you can restore functionality by connecting your robot to a power source and performing a manual reboot.
Restarting Misty
If you need to restart Misty:
- Turn off the power switch on Misty's base.
- Wait 10 seconds.
- Turn on the power switch on Misty's base again. Misty has rebooted when her eyes are fully open.
Turning Misty Off
To turn off your robot, turn off the power switch on Misty’s base.
Note: There is no graceful shutdown at this time. When Misty’s battery gets below about 7 volts, she abruptly powers down.
Connecting to Wi-Fi
You send REST commands to Misty and install skills on her system over your local Wi-Fi connection. When your robot is powered on, you can set up Misty's internet connection with the Misty App.
Charging Misty II
There are two ways to charge Misty II. You can use the wireless charging pad that comes with your robot, or you can plug the power supply directly into the power port on Misty's base. Misty does not need to be turned on to charge.
Wireless Charging
To use Misty's wireless charging pad, follow these steps:
- Connect the power supply to the power port on the back of the charging pad.
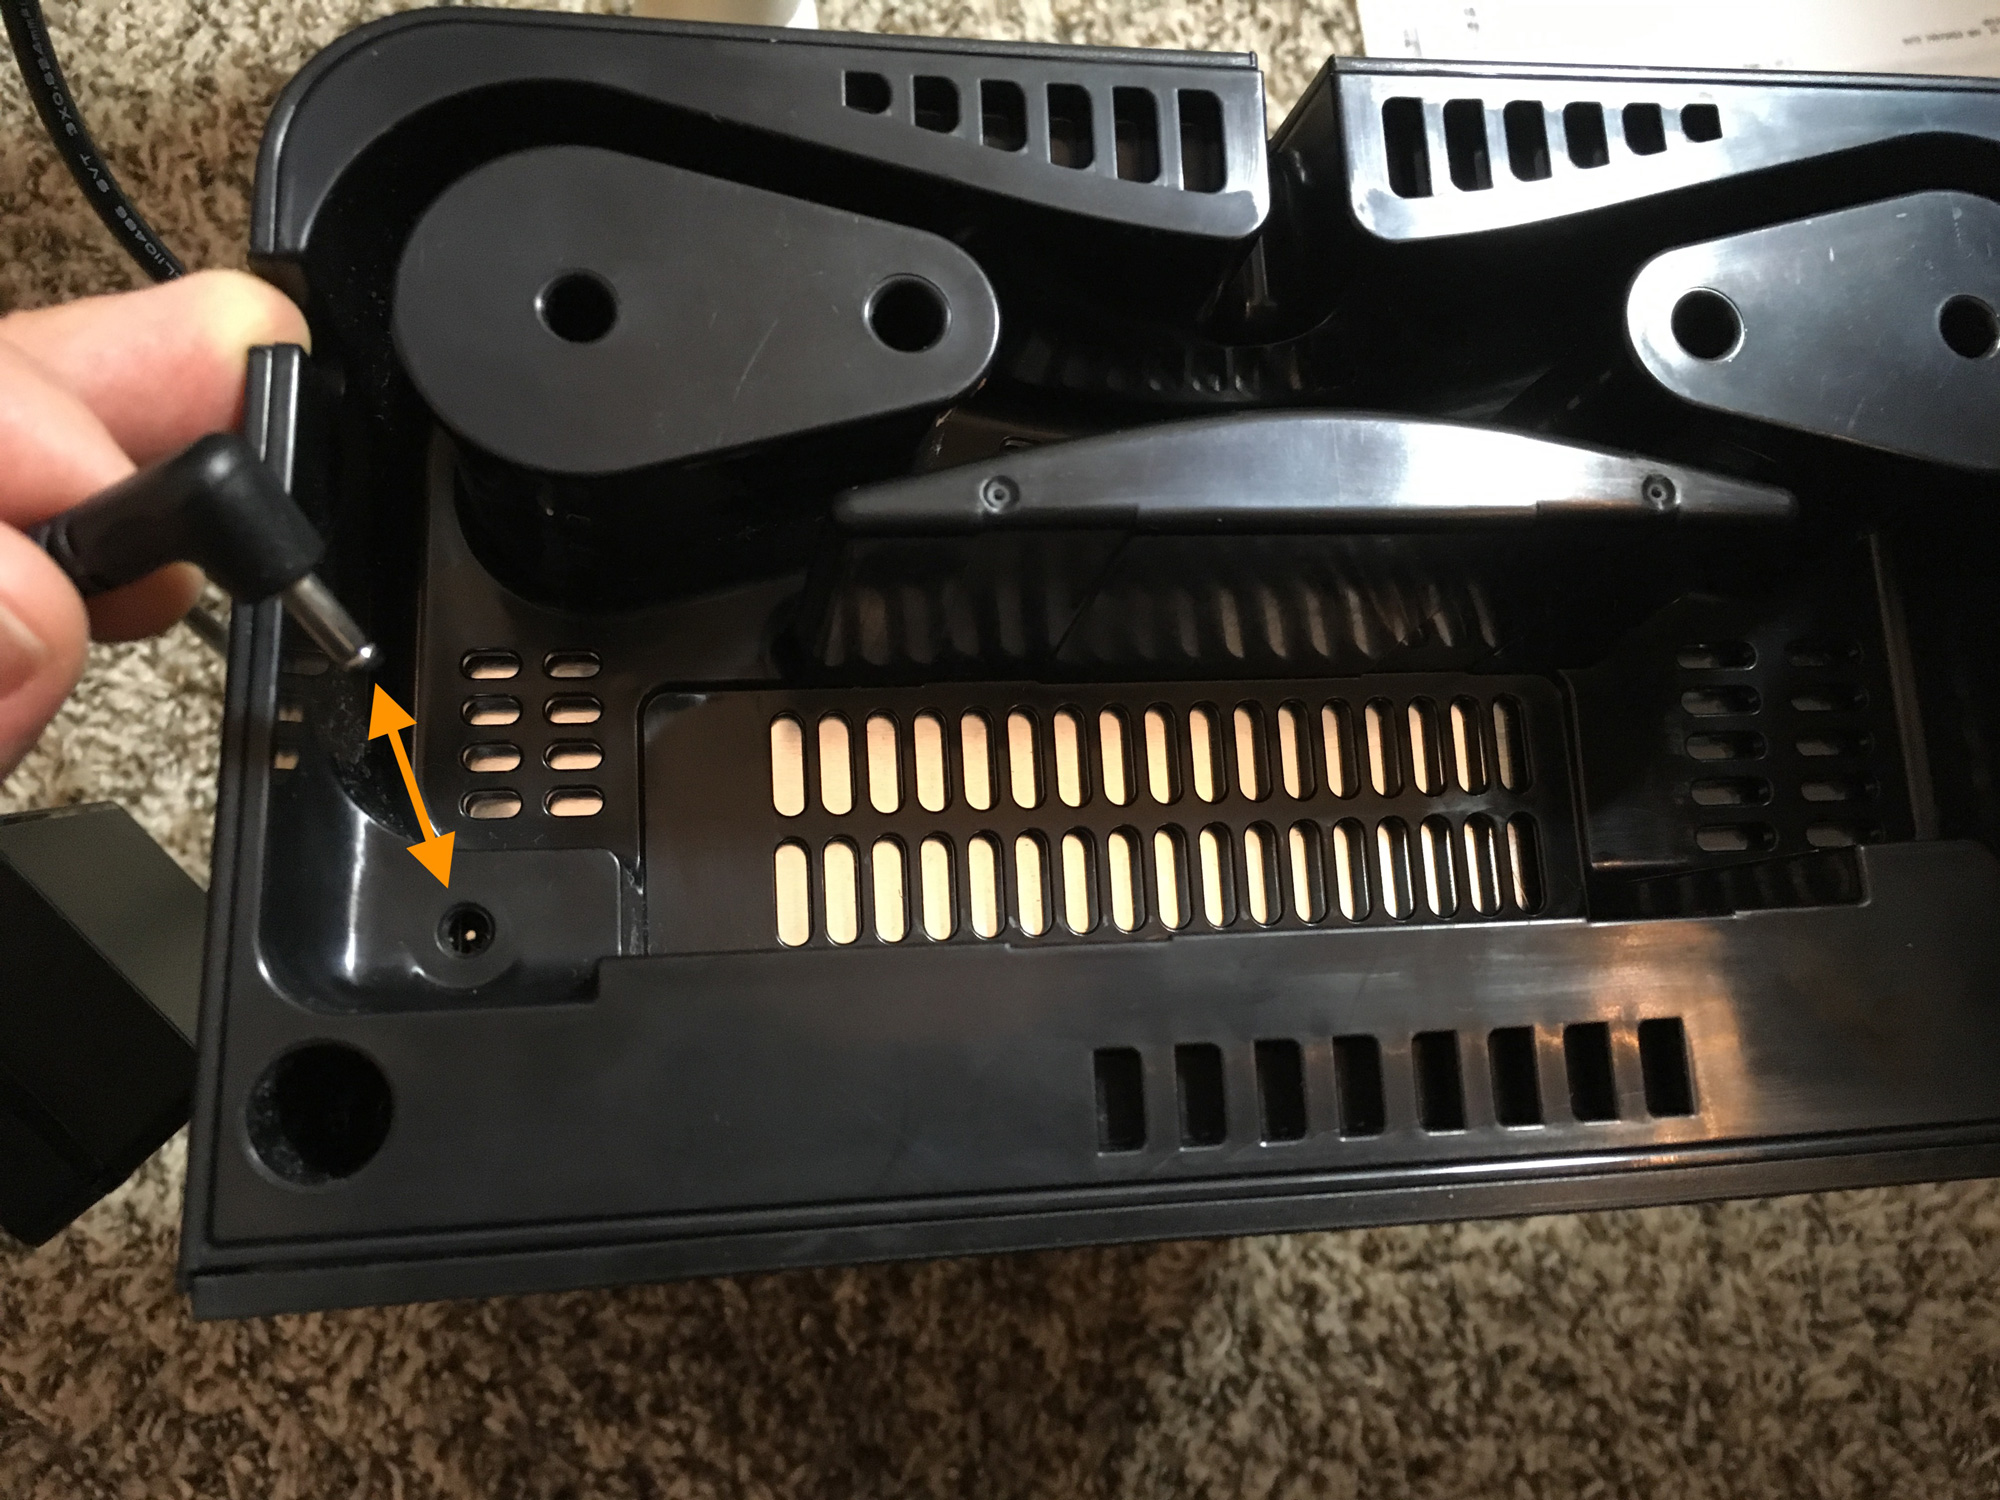
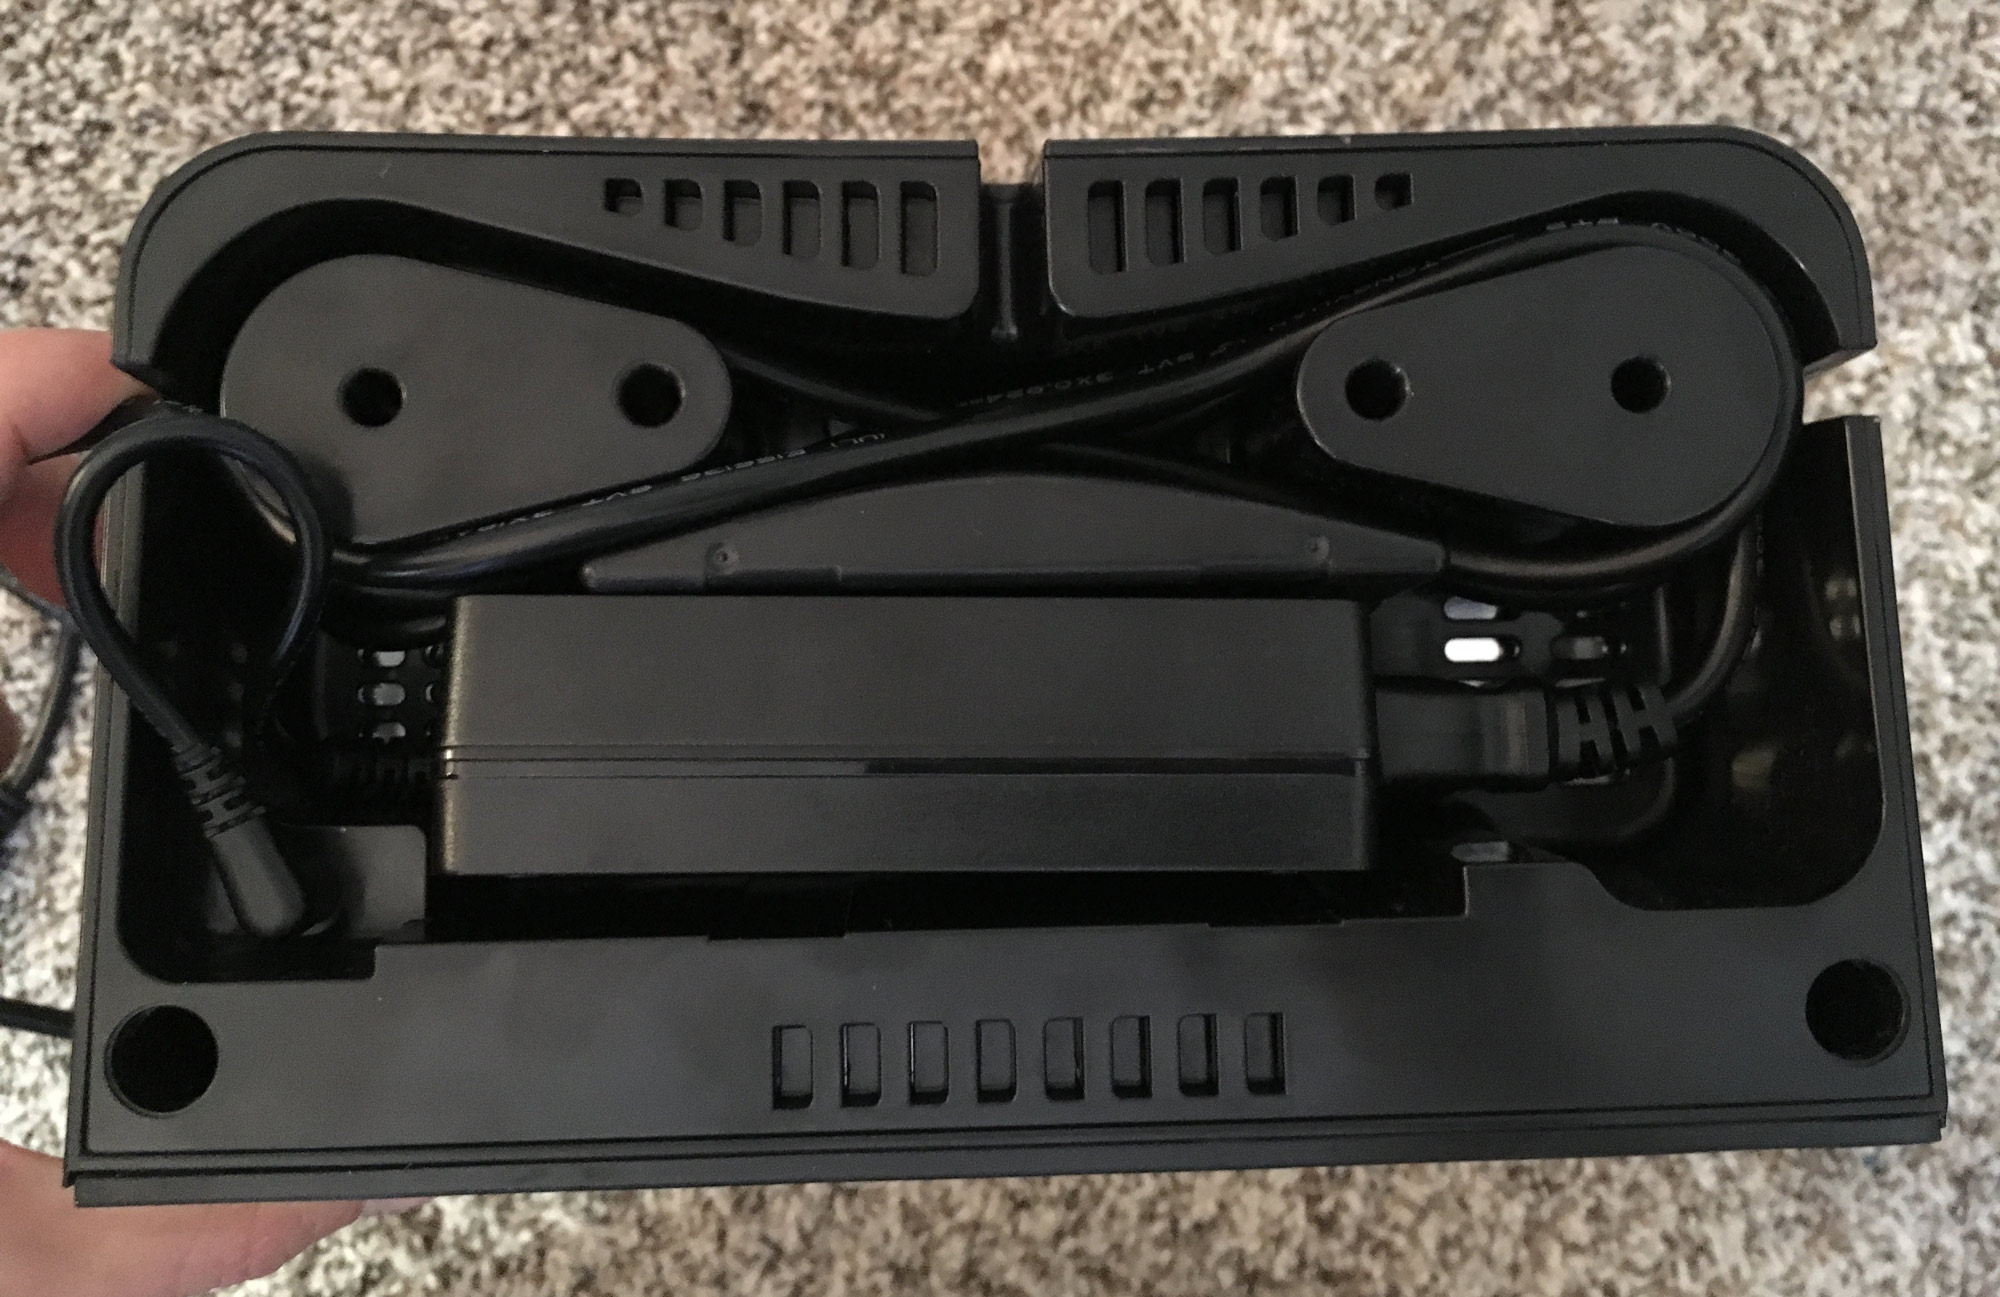
- To prevent tripping hazards, place the power brick inside the charging pad and wrap any extra length of the power cable around the nodes inside the rear compartment, as seen in the photo below.
- Place the charging pad on the floor.
- Plug the power cable into the wall.
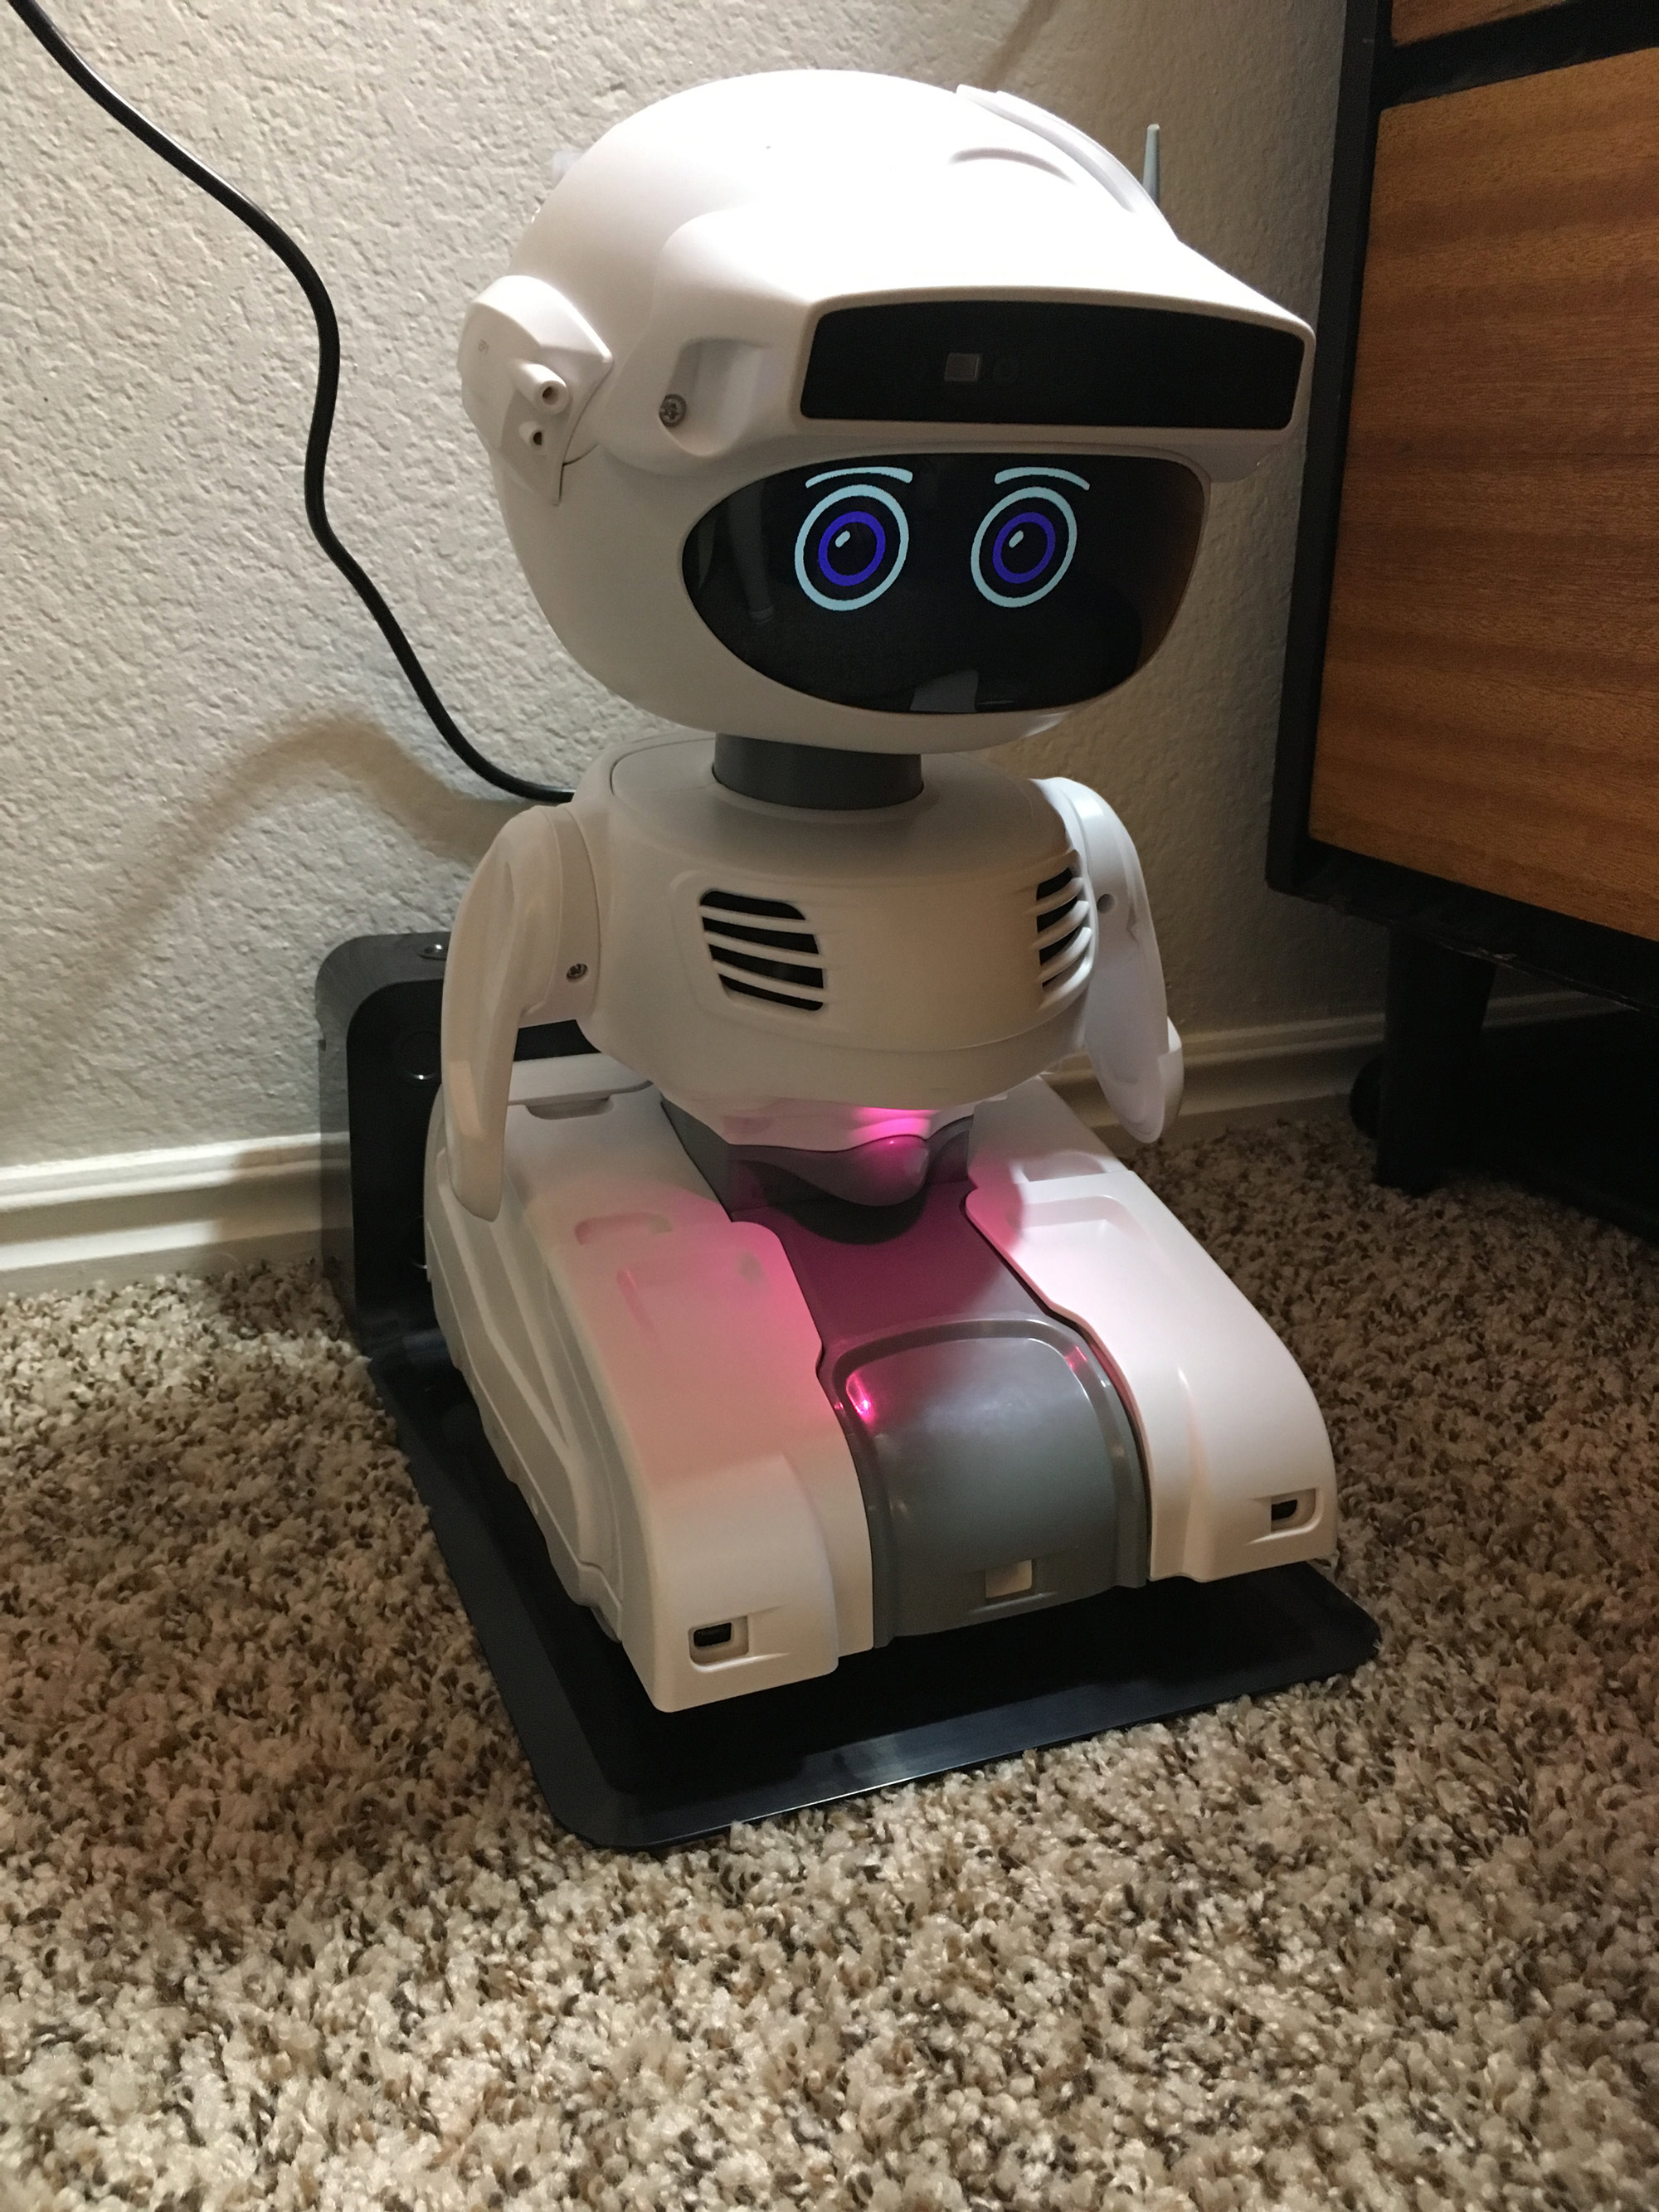
- Place Misty on the center of the charging pad. Position her to be facing out, with her back against the rear compartment of the charging pad.
Wired Charging
You can also charge Misty by plugging the power supply directly into the power port. Misty's power port is on the bottom of Misty, next to her power switch.
Hardware Notifications
When you interact with Misty, she notifies you of certain events by playing sounds or changing the color of her chest LED. These notifications are enabled by default. You can turn them off by sending a request to the SetNotificationSettings endpoint in Misty's REST API.
The following notifications are enabled by default:
Audio Notifications
- Wake Word - When Misty recognizes the "Hey, Misty!" key phrase, she plays the system audio file
s_SystemWakeWord.wav. You can change the default wake word sound by sending a request to theSetNotificationSettingsendpoint in Misty's REST API.
LED Notifications
- Charging - While Misty is powered on and charging, her chest LED pulses orange. When her battery is fully charged and she is on/connected to her charger, the LED turns solid orange.
- Face Training - When you are training Misty on a new face, her chest LED displays the following notifications:
- When the face detection phase of the training process is complete, the LED turns green.
- When training is complete, the LED blinks green three times.
- If training fails, the LED blinks red three times.
- If Misty sees more than one face, the LED blinks yellow three times.
- If Misty doesn't see a face, the LED turns yellow.
- System Updates - While Misty is performing a system update, the LED blinks white.
Misty II Specs
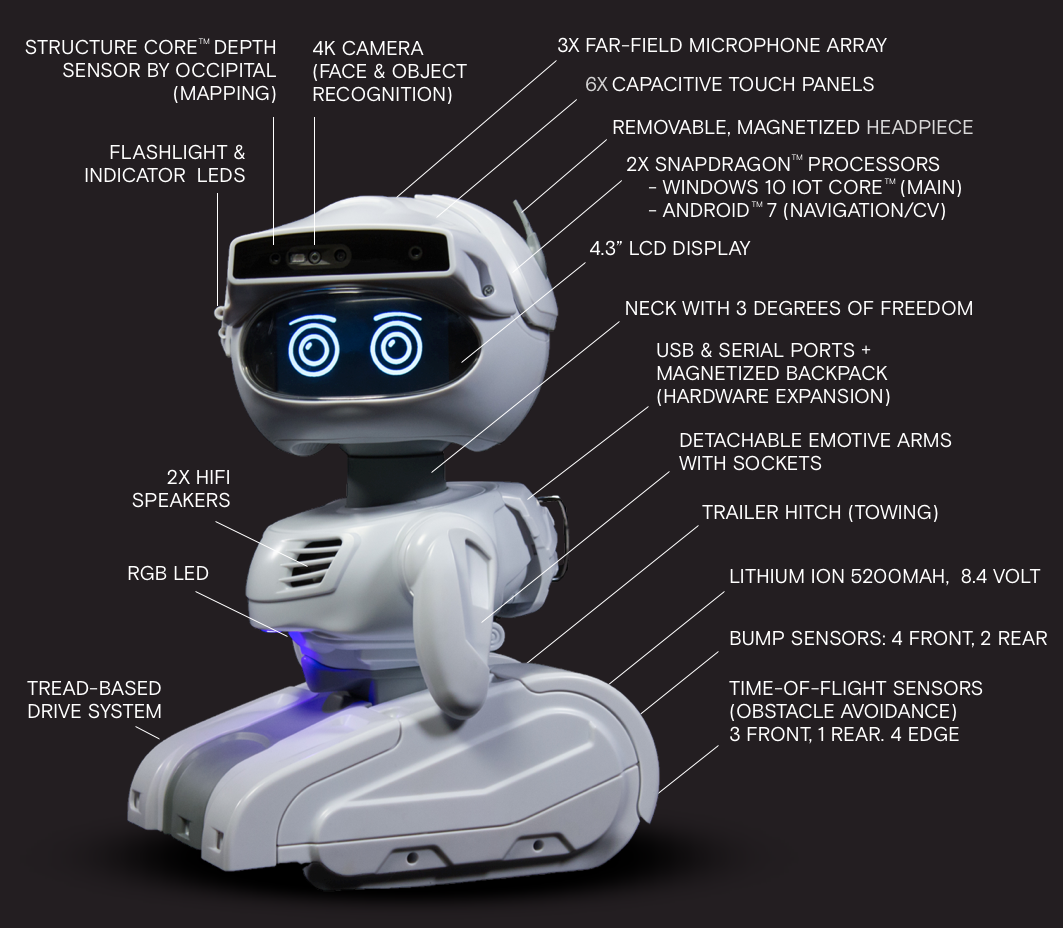
Misty is packed with sophisticated hardware and software features that contribute to her ruggedness and extensibility as a platform.
Size
- Height: 35.56 cm / 14 in
- Depth: 25.4 cm / 10 in
- Width: 20.32 cm / 8 in
- Weight: 2.7 kg / 6 lbs
Processors
- Qualcomm® Snapdragon 820™ mobile processor
- Qualcomm® Snapdragon 410™ processor
Computer Vision
- Occipital Structure Core depth sensor for 3D maps
- 166° diagonal field of view wide-angle Structure Core camera (106° horizontal x 60° vertical)
- 4K camera
- Facial recognition
- Deep-learning AI using Qualcomm® Snapdragon™ Neural Processing
Sound
- 3 far-field microphones using Qualcomm® FluenceTM PRO
- 2 high-fidelity speakers with engineered sound box and bass port
Touch
- 6 capacitive touch sensors on head and chin
Distance and Obstacle Detection
- 8 IR-based time-of-flight sensors (3 forward, 1 rear, 4 edge/downward)
- 10 bump sensors (3 tied in parallel on each front corner, 2 tied in parallel on each rear corner)
Movement
- Patent-pending 3-degree of freedom neck
- Easily customizable moving arms
- Sturdy track-driving tread system
- Trailer hitch to pull a payload
Display & Light
- 4” LCD image display/screen
- Bright LED flashlight
- Multi-color LED chest light
Connectivity
- 2.4 and 5 Ghz WiFi connection
- Bluetooth and Bluetooth Low Energy capabilities
Extensibility
- USB/Serial-connected backpack for hardware extension
- Arduino-compatible Backpack (optional)
- Magnetic helmet connection point
Operating Systems
- Windows IoT Core™ (Main)
- Android™ 8 (navigation/computer vision)
System Updates
Misty checks for available system updates every time you turn her on or restart her. If you've not restarted her recently, you can check for and perform updates for Misty with the Misty App or Command Center.
Updates can include:
- New images and audio assets
- Motor controller firmware updates
- Real-time controller firmware
- Occipital Structure Core depth sensor firmware
- Home Robot application (running on Windows IoT Core)
- Sensory Services application (running on Android)
- OS updates
We recommend you check for updates on a weekly basis.
Important: Please keep Misty plugged in for the entire duration of the update and do not attempt to send commands to her during this time.
Hazards System
Misty's software includes a built-in hazards system that is intended to prevent your robot from executing commands that could cause her harm. This system uses data from Misty's sensors to prevent Misty from driving off of surfaces that could cause her to tip or fall, such as tables, desks, or stairs. It also stops Misty from continuing to drive when she senses an obstacle nearby or that she has collided with an object.
In addition to protecting your robot from harm, the hazards system sends an event message each time Misty enters or exits a hazards state. You can use these messages to programmatically alter Misty's course when she detects cliffs or obstacles while autonomously navigating her environment. See the Sensor & Skill Data section of these docs for details on using this data in your skills.
Bump & Time-of-Flight Hazards
By default, Misty's bump and time-of-flight sensors put the robot into a hazard state in the following circumstances:
- when her edge time-of-flight sensors detect a drop distance of 0.06 meters (60 mm) or greater in the direction she is moving.
- when her range time-of-flight sensors detect an obstacle 0.15 meters (150 mm) or closer in the direction she is moving.
- when one of her bump sensors becomes activated, indicating she has collided with an object.
When Misty detects an obstacle or an edge, she ignores any commands that would move her in the direction of the sensors that are in a hazard state. For example, when Misty is driving forward, she stops driving if one or more of the following happens:
- if one of her front-facing bump sensors is pressed
- if the front edge time-of-flight sensors detect a high ledge
- if the front range sensors detect an obstacle nearby
In this situation, after she stops driving, Misty ignores any forward drive commands until the system indicates none of her front bump or time-of-flight sensors are in a hazard state. This can be achieved by having the robot back up and change directions.
Misty's Max Speed
To enable the hazards system to work effectively, Misty's max speed is limited to ~450 mm/s. This is the highest speed at which Misty can safely detect most ledges and stop moving, without being carried over the edge by any built-up momentum. The hazards system will be enhanced in future updates to allow for increased performance and to increase Misty's default max speed.
Note: While edge detection has proven effective in most of our testing, there are still situations in which the robot may fail to catch herself. It's more difficult for the hazard system to detect an edge when Misty is driving backwards or on tables with rounded edges. The larger the radius of the curve, the harder it is for Misty to stop moving in time to prevent falling. Until further enhancements to the hazards system are in place, we recommend you continue to operate Misty using the foam block on high surfaces like tables, counter-tops, and desks, unless you are supervising Misty and can safely catch her in the event of a fall and have also done extensive testing with the robot in your specific environments.
Hardware Extensibility
You can augment Misty's native capabilities by using external microcontrollers, sensors, and other third party hardware in your skills.
External hardware can connect to the Universal Asynchronous Receiver-Transmitter (UART) serial and Universal Serial Bus (USB) ports on Misty's back. Remove the magnetic backpack attachment to access these ports.
The USB port can be used with a USB-to-Ethernet adapter to connect Misty to your local network. Misty’s API/SDK does not currently have access to the USB port’s data interface, but this port can be used to supply power to external devices. The UART serial port enables communication between Misty's skills and an external device. The configuration of the pins on this port simplifies connection between Misty and her Arduino-compatible backpack. You can also connect your own microcontroller, a Raspberry Pi, or other UART serial-enabled hardware.
The UART serial and USB port channels have separate, isolated power controllers that allow Misty to supply power to external hardware. The USB port can provide up to 500 mA, and the pins for the UART serial port are configured as follows:
- RX (receiver): Receives messages sent to Misty from an external device.
- GND (ground): The grounding pin for the electrical circuit.
- TX (transmitter): Transmits messages from Misty to connected hardware.
- 3V: Supplies up to 1A of power to the connected hardware at 3.3v.
Misty (Arduino-Compatible) Backpack
The Misty (Arduino-Compatible) Backpack is a microcontroller designed to connect to the UART serial port on Misty’s back in a plug-and-play fashion, without any modification.
Note: If you did not purchase the Misty (Arduino-Compatible) Backpack, the "backpack" shipped with your robot does not contain a microcontroller. You can still use Misty's generic backpack to extend her hardware by connecting your own external device to her UART serial port.
Programming the Misty (Arduino-Compatible) Backpack
The Misty (Arduino-Compatible) Backpack uses a microcontroller pre-programmed with a bootloader that allows you to upload code exactly as you would with a normal Arduino, without requiring an external hardware programmer.
Follow these steps to use the Arduino IDE to write programs for the Misty (Arduino-Compatible) Backpack:
- Install the Arduino IDE.
- Connect the Misty backpack to your computer via the backpack's USB micro port.
- Open the IDE and select Tools from the top menu.
- From the Board sub-menu, select Arduino Pro or Pro Mini.
- From the Processor sub-menu, select ATmega328P (3.3V, 8MHz).

- Write your sketch and upload it to the microcontroller.
For more information about writing a sketch, see the reference materials and tutorials hosted on the Arduino website.
In the code you write for Misty's Arduino-compatible backpack (or any other Arduino microcontroller), you use the Serial library to configure communication between the microcontroller and Misty. In the setup() function of your sketch, use the Serial.begin() function to set the data transfer rate to 9600 baud. Then, in the loop() function, use Serial.println() to send data to Misty.
void setup() {
  Serial.begin(9600);
}

void loop() {
    delay(1000);
    Serial.println("{\"message\":\"Hello!\"}");
}
We recommend formatting data you send as JSON string to make it easier to parse in your skill code.
To read messages sent to Misty, you register for SerialMessage events in your skill code. SerialMessage events occur when Misty receives a message through the RX pin of her UART serial port. By default, the data for SerialMessage events is processed by a _SerialMessage() callback function. You define how this callback handles the message in your skill code.
// Return the value of the "SerialMessage" property in the
// SerialMessage data object
misty.AddReturnProperty("SerialMessage", "SerialMessage");

// Register for SerialMessage events. Set the debounce rate to 0, or
// use the rate defined in the sketch. Set keepAlive to true, so
// the event does not un-register after the first _SerialMessage()
// callback.
misty.RegisterEvent("SerialMessage", "SerialMessage", 0, true);

function _SerialMessage(data) {
    try {
        if(data !== undefined && data !== null) {
            var obj = JSON.parse(data.AdditionalResults[0].Message);
            var message = obj.message;
        }
    }
    catch(exception) {
        misty.Debug("Exception" + JSON.stringify(exception));
    }
}
To send messages from Misty to an external device, you can use the misty.WriteSerial() function. If you are running your skill on a remote device, you can send a request to the REST endpoint for the WriteSerial command.